|
|
| |
|
|
 A compass is nothing more than a magnet which focuses between the magnetic lines of the earth. If the alignment is displayed in comparison with directions
you are able to nivigate. With a compass you can field your position relative to objects and determine directions. When these directions,
in the form of degrees, are combined with a map, you can determine exact positions and directions for moving.
Compasses come in many shapes, sizes and therefore prices.
The difference is made in a number of tools that benefit the accuracy of navigation. In the following explanation there is choosen for the
Recta liquid compass. The principle stays the same for each compass.
A compass is nothing more than a magnet which focuses between the magnetic lines of the earth. If the alignment is displayed in comparison with directions
you are able to nivigate. With a compass you can field your position relative to objects and determine directions. When these directions,
in the form of degrees, are combined with a map, you can determine exact positions and directions for moving.
Compasses come in many shapes, sizes and therefore prices.
The difference is made in a number of tools that benefit the accuracy of navigation. In the following explanation there is choosen for the
Recta liquid compass. The principle stays the same for each compass. |
| |
|
The Parts
|
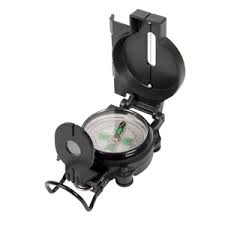
When the compass is extended, you should see the following:
 A. Housing
B. extendible tray, a plastic box which holds the parts together.
C. Compass Rose
D. Compass needle
E. Visor
F. Mirror
G. String
The visor is the groove on the box, with this, the focus of the compass can be performed accurately.
The mirror and the string are hereby additional resources.
A. Housing
B. extendible tray, a plastic box which holds the parts together.
C. Compass Rose
D. Compass needle
E. Visor
F. Mirror
G. String
The visor is the groove on the box, with this, the focus of the compass can be performed accurately.
The mirror and the string are hereby additional resources. |
| |
|
Use
|
 From above we know that the compass needle points to the North.
With a compass now the North identifiable.
Turn the compass rose so that the zero points to the visor. Under the compass rose is an extra arrow to adjust exactly.
When the compass is aligned with the needle it points to the North. (picture left)
From above we know that the compass needle points to the North.
With a compass now the North identifiable.
Turn the compass rose so that the zero points to the visor. Under the compass rose is an extra arrow to adjust exactly.
When the compass is aligned with the needle it points to the North. (picture left) |
| |
|
Set a direction
|
 If you want to move from point A to point B, assuming there are no roads that lead to point B,
you do this by compass. Measure the direction and distance on the map. Set the compass to this direction and you can move.
Draw on the map, a line between A and B. Measure the angle of the line with the North South Line (any grid line on the map).
In our example, we take an angle of 70ş measured to the East. Turn the compass rose to 7 (for 70ş, see picture). Hang the compass with the string
around your neck and pull the mirror out. Take the compass in one hand and stretch the arm so the compass fixates the string.
Look in the mirror and turn around your own axis until the North Arrow reaches the 0ş. Your compass is now pointing 70ş East.
An aid to find the zero, in the compass rose, are the two yellow lines .
Measuring the direction is done with a protractor card (see chapture map)
From map to compass remember to use a declination angle (see chapture map)
When the Map is placed to the north, you can directly adjust the compass to the required direction.
If you want to move from point A to point B, assuming there are no roads that lead to point B,
you do this by compass. Measure the direction and distance on the map. Set the compass to this direction and you can move.
Draw on the map, a line between A and B. Measure the angle of the line with the North South Line (any grid line on the map).
In our example, we take an angle of 70ş measured to the East. Turn the compass rose to 7 (for 70ş, see picture). Hang the compass with the string
around your neck and pull the mirror out. Take the compass in one hand and stretch the arm so the compass fixates the string.
Look in the mirror and turn around your own axis until the North Arrow reaches the 0ş. Your compass is now pointing 70ş East.
An aid to find the zero, in the compass rose, are the two yellow lines .
Measuring the direction is done with a protractor card (see chapture map)
From map to compass remember to use a declination angle (see chapture map)
When the Map is placed to the north, you can directly adjust the compass to the required direction. |
| |
|
Recording a Direction (shooting)
|
 The opposite of a setting a direction is recording it. A popular name for this is Shooting.
Hold the compass in the same way as you were when setting out a direction. Now direct your compass on the item you want to record.
Turn the compass until the magnetic needle is at 0 (think about the yellow lines and the mirror)
Read the number of degrees you've recorded.
Shooting is used to determine positions. If you have two or more landmarks wich you can allso find on the map.
Shoot their directions and take those to the map. You do this by, drawing a line, starting at the familiar point in the opposite direction you recorded.
Where the lines intersect is your position.
Example:
You shoot a lighthouse at 70 degrees East and a church tower at 90 degrees West.
Draw a line on the map from the lighthouse toward your position 70 – 180 = 110ş West.
Draw a line on the map from the church tower toward your position 90 – 180 = 90ş East.
Where they intersect is your position.
The opposite of a setting a direction is recording it. A popular name for this is Shooting.
Hold the compass in the same way as you were when setting out a direction. Now direct your compass on the item you want to record.
Turn the compass until the magnetic needle is at 0 (think about the yellow lines and the mirror)
Read the number of degrees you've recorded.
Shooting is used to determine positions. If you have two or more landmarks wich you can allso find on the map.
Shoot their directions and take those to the map. You do this by, drawing a line, starting at the familiar point in the opposite direction you recorded.
Where the lines intersect is your position.
Example:
You shoot a lighthouse at 70 degrees East and a church tower at 90 degrees West.
Draw a line on the map from the lighthouse toward your position 70 – 180 = 110ş West.
Draw a line on the map from the church tower toward your position 90 – 180 = 90ş East.
Where they intersect is your position. |
|
|
|
|
| |